


Painting Tips and Tricks
3 posters
Page 1 of 1


Spectre- Field Marshall

- Posts : 224
Join date : 2011-05-04
Location : Ohio
 Re: Painting Tips and Tricks
![]() Ido May 26th 2011, 7:58 pm
Ido May 26th 2011, 7:58 pm
I'm getting a very good appreciation for your suggestions here, especially the thin coats. My Flashman had a rediculous coat of gold, at one point, the left arm laser is literally 1/8" away from the torso, but they were connected by paint. and then, I was an idiot and didn't remove the Gloss Enamel blue coat underneath that before repainting in gold...
Thin coats FTW!
Thin coats FTW!

Ido- Staff Sgt.

- Posts : 47
Join date : 2011-05-22
Location : St. Marys, OH
Re: Painting Tips and Tricks
![]() Spectre May 27th 2011, 8:20 am
Spectre May 27th 2011, 8:20 am
Dont feel bad Ido, we have ALL made those mistakes at one point or another! Here is another quick tip you may find helpful, How to Strip Paint. #1 Get out all those old nasty painted Mechs #2 Procure an old butter tub (or other small container with a lid. #3 Go buy a bottle of "Pine-Sol" (I like lemon scented, it gives my mechs that fresh feeling). #4 Place a mini in the "tub" and fill it with Pine-Sol, put lid on tub. #5 Usually within about 15 minutes the Pine-Sol will "lift" the old paint, for "tougher" paint you may have to leave it soak anywhere from an hour to overnight. #6 Remove mini and with an old toothbrush start scubbing the paint off, you may have to rinse/scrub and repeat as necessary. Now why Pine-Sol??? you may ask...well over the years I have tried several "commercial" paint strippers and "homebrew" (brake fluid, mineral spirits, etc) things in a attempt to remove old paint. I have found that some strippers will attack plastics and conversly some will eat metals! This is NOT GOOD!! However Pine-Sol does neither and is not harmful to breathe or touch. Now Pine "cleaner" isnt perfect, and requires alot of scrubbing and may require more than one "dip" (in the tub) also after/during the Pine "Bath" parts may come loose or fall off, dont freak out...it removes/eats old glue too!! Trust Me thats a GOOD THING! especially if you have too much glue on your mini (and if its painted poorly,the glue was probably too thick also..a common mistake made by "rookies"). I have found this (Pine-Sol) to be the best solution (and the cheapest!). So give it a try and I am sure you will be pleased with the results. I hope this helps!!
Spectre- Field Marshall
- Posts : 224
Join date : 2011-05-04
Location : Ohio
Re: Painting Tips and Tricks
![]() Ido May 27th 2011, 10:59 am
Ido May 27th 2011, 10:59 am
Heh, should have asked here first. I've had 2 mechs soaking in a glass cup in some paint thinner all night. has barely removed a thing. Fortunately, I did think to check if it was safe to use w/ plastics first. (NOPE.) And I even verified that accidentally with the tooth brush I was using. figured "a quick dip into the thinner shouldn't hurt the brush and will help get this clean." 3 strokes of the brush and it fell into pieces. Guess I'll be picking up Pine-Sol this weekend.
Thanks man!
Thanks man!
Ido- Staff Sgt.
- Posts : 47
Join date : 2011-05-22
Location : St. Marys, OH
Re: Painting Tips and Tricks
![]() Spectre May 28th 2011, 2:47 pm
Spectre May 28th 2011, 2:47 pm
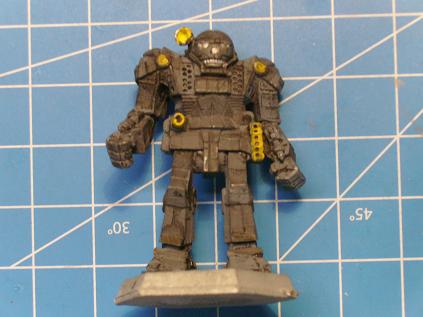
Here is just a small update on "Pine-Sol". Take a look at this Atlas I procured for "Soldier of Steel" its sporting a pretty bad paint job. Now I got this for $7.00 from BV Traders (Thanks Mike!), a new Atlas is $13.95 + $1.50(hex base) for a total investment of $15.45 (from Ironwind). You will notice this mini HAS a hex base glued to his feet, so I saved "Soldier" over 50%!!! (Bonus!)
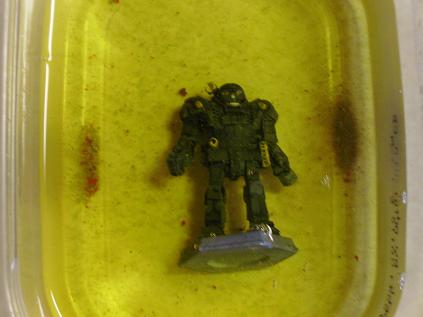
Now we take our "nasty" mech and leave it in a tub of "Pine-Sol" on the counter. Notice the paint laying at the sides of the tub...I have used this same pine cleaner on a dozen or so minis already and have not yet had to "refresh" it!!
This next pic shows the mini after just 25 minutes in "the bath", and a quick once over with an old toothbrush. You can clearly see it is already peeling the paint away. The paint on this Atlas was not too heavy but was very old, so I dipped my brush into the pine cleaner and scrubbed the mini very good until he "sudded-up" (ooh, bubbles!), then threw him back in the tub.
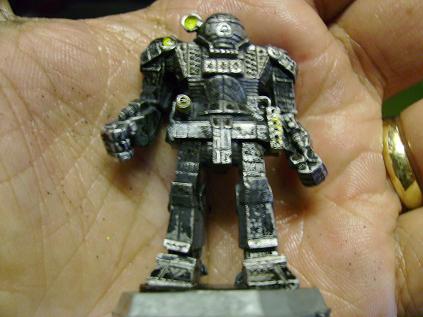
Now all you (or I) have to do is wait, scrub, rinse, repeat as necessary. Trust Me this works very well, and if you did not already notice this is an old Atlas (1987) and made of lead not pewter. The pine cleaner will NOT attack or "soften" your old "RP" minis! The entire process (depending on how nasty the paint is) may take several tries, but as with painting DONT RUSH!! I know you are geeked to get your minis in great shape and show off that new paint job at the next game session but if you take your time your end results will be worth it!!
Good Luck and Happy Gaming!!
Now we take our "nasty" mech and leave it in a tub of "Pine-Sol" on the counter. Notice the paint laying at the sides of the tub...I have used this same pine cleaner on a dozen or so minis already and have not yet had to "refresh" it!!
This next pic shows the mini after just 25 minutes in "the bath", and a quick once over with an old toothbrush. You can clearly see it is already peeling the paint away. The paint on this Atlas was not too heavy but was very old, so I dipped my brush into the pine cleaner and scrubbed the mini very good until he "sudded-up" (ooh, bubbles!), then threw him back in the tub.
Now all you (or I) have to do is wait, scrub, rinse, repeat as necessary. Trust Me this works very well, and if you did not already notice this is an old Atlas (1987) and made of lead not pewter. The pine cleaner will NOT attack or "soften" your old "RP" minis! The entire process (depending on how nasty the paint is) may take several tries, but as with painting DONT RUSH!! I know you are geeked to get your minis in great shape and show off that new paint job at the next game session but if you take your time your end results will be worth it!!
Good Luck and Happy Gaming!!
Spectre- Field Marshall
- Posts : 224
Join date : 2011-05-04
Location : Ohio
Re: Painting Tips and Tricks
![]() Ido June 7th 2011, 11:22 pm
Ido June 7th 2011, 11:22 pm
FINALLY! Got a chance to get back to work on my shoddy mini's. Gotta verify the Pine-Sol. GOLDEN suggestion. I let 2 mini's soak for 3 days while I was out of town, came back and almost no paint had come off, even after scrubbing. This evening, I did 4 sets of ~ 20 minutes in the pine-sol & scrub and I'm done removing the paint.
And now, a question. I'd remembered you'd suggested using primer before painting. (I'd never done that back in the day) So I picked myself some up the other week, but now that I'm about ready to use it, I re-read your tip and saw the comment about "Non-Filling". So looked on the can, but it says nothing about it. So I looked it up online and found that it "smoothes uneven surfaces." I'm guessing, but wanting verification, that that means the same thing?
Stupid Primer Paint
Could you post the product code of the primer you use?
Ido- Staff Sgt.
- Posts : 47
Join date : 2011-05-22
Location : St. Marys, OH
Re: Painting Tips and Tricks
![]() Spectre June 8th 2011, 3:28 am
Spectre June 8th 2011, 3:28 am
I personally prefer KRYLON Flat Black Primer, as far as the "filling" primer goes stay away from it!! All primer "smoothes uneven surfaces", and if it was the FILLING kind it would be labeled as such on the front of the can, so chances are Ido your primer is ok. The "filling" stuff is made for auto-body and is much thicker formula...and yes you should prime everything you paint!! That includes model buildings, minis, furniture, etc...the reason is that primer has an "etching" effect on your surface to be painted and gives the paint some "tooth" to bite into, also after your done repainting your minis may I suggest Krylon MATTE clear as a sealer. The Matte clear will protect your finish and it will make your minis look more realistic as it will eliminate any high gloss (tanks dont have shiney paint). Oh, I was a bit confused by the wording of your post....did you have success with the pine cleaner?  Anyway I hope this helps. Good luck!
Spectre- Field Marshall
- Posts : 224
Join date : 2011-05-04
Location : Ohio
Re: Painting Tips and Tricks
![]() Ido June 8th 2011, 12:54 pm
Ido June 8th 2011, 12:54 pm
Hah! Yeah, didn't word that well, did I? I'd let the mini's soak in PAINT THINNER for 3 days, which did nothing. Used the Pine-Sol, and the paint came right off.
Another question, a little ahead of myself: About how many coats of the actual paint do you guys usually apply after it's been primed?
Another question, a little ahead of myself: About how many coats of the actual paint do you guys usually apply after it's been primed?
Ido- Staff Sgt.
- Posts : 47
Join date : 2011-05-22
Location : St. Marys, OH
Re: Painting Tips and Tricks
![]() Josh.0 June 8th 2011, 1:17 pm
Josh.0 June 8th 2011, 1:17 pm
It had been awhile since I had painted on this scale but getting back into it I have found that the mini's I am finishing now took 2-3 thinned coats of acrylic Base color(s) and 1-2 drybrush coats with a black wash between base and drybrush. I would say after you thin the acrylic(if needed) it is an "eye" thing. If it looks good to you then it's good. I know when I applied one coat of acrylic I didn't think it was enough by just looking at it but after a second it shaped up nicely, a couple took 3 coats to look even with the others(one lance). When in doubt just thin it down so you can apply more if needed. Maybe 1 part paint and 1-2 parts water. Hope this helps Ido.

Josh.0- Captain

- Posts : 162
Join date : 2011-05-04
Location : N.W. Ohio -

Re: Painting Tips and Tricks
![]() Ido June 8th 2011, 6:21 pm
Ido June 8th 2011, 6:21 pm
wow... now I feel like a noob. Can you define "Black-Wash" for me? I'm starting to feel really pathetic here... lol
Ido- Staff Sgt.
- Posts : 47
Join date : 2011-05-22
Location : St. Marys, OH
Re: Painting Tips and Tricks
![]() Josh.0 June 8th 2011, 8:07 pm
Josh.0 June 8th 2011, 8:07 pm
Nah, don't feel bad. I just recently refreshed my memory on all this stuff too. It had been 15+ years since I've done this stuff so I had to actualy look it up, lol. What it is, is a very thinned down black (consistency of milk) that will just lay into all the cracks/lines of the mini. Making all the seams appear with some depth. Depending on the paint you are using its going to be somewhere in the ballpark of 1 part paint to 6-9 parts water. It is best to make it as thin as possible as to not clog up the seams with paint. As the water evaporates it will leave behind the pigment in those cracks and seams. Now it will make your paint job look shoddy so a dry-brush coat after is needed to bring back the base colors on the surface. The dry-brush will just "scratch" the surface and not touch the wash you have applied before, popping the base colors back out and leaving the depth lines. Hope this helps.
p.s. I didnt mention that you can apply several coats of wash as well so if you make it too thin just wait till it dries and apply as needed.
p.s. I didnt mention that you can apply several coats of wash as well so if you make it too thin just wait till it dries and apply as needed.
Josh.0- Captain
- Posts : 162
Join date : 2011-05-04
Location : N.W. Ohio -
Re: Painting Tips and Tricks
![]() Josh.0 June 10th 2011, 2:04 pm
Josh.0 June 10th 2011, 2:04 pm
These Techniques are straight out of the Total Warfare Rulebook. Reading through the "Painting Miniatures" section of the book I couldn't help but to make a post of these basic painting techniques as I have found the definitions to be quite helpful myself.
BASIC TECHNIQUES
Here are some common painting techniques and terms.
Washes
A wash is a thin layer of color, usually applied on top of another
color that has already dried. The wash is semi-transparent, so that
the base color under it still shows through. For example, a red
wash applied over a black base color will produce a dark red tone.
The black base provides the darkness, while the wash adds color
to the final tone. A dark wash may also be applied to a lighter base
color. In this case, the thin wash color will seep into the deeper
details of the painted section, accentuating the surface texture of
the miniature.
The simplest way to create a wash is by thinning paint with water.
The consistency of the wash—how thin or thick it is—determines
how much of the base color shows through. The consistency of a
wash will also affect how easily the wash flows, or bleeds.
To apply a wash, first mix a little black paint into a puddle of
the base coat color. Add water to this puddle until it turns semitransparent.
Now you have a choice: you can do a coverage wash
or a detail wash. A coverage wash will often darken, or stain, the
basecoat. A coverage wash is good to use before you block in the
panels or dry-brush the miniature. For detail washing, you
use a fine-tipped brush such as a 0 or 5/0 to paint the wash
into panel lines, crevices and details. Detail washing is similar
to blacklining/outlining. Detail washing works best after dry
brushing but may be used before. Another use for detail
washing is to “clean up” panels and large areas that have been
dry-brushed. Refer to the banding technique, but use a wash
that is the same as the base coat.
Vary the consistency of your washes, and watch how the
wash affects the final color.
Dry Brushing
Dry brushing lets you apply small bits of color, usually
highlights, to a section already painted. This method is used to
apply colors to the raised surfaces of the miniature, rather than
the recessed details. Dry brushing can be hard on the bristles
of a brush, so use your roughest brush (in this case, the Size 2
brush) or an old/cheap brush. Many painters reserve specific
brushes for dry brushing. Size 8 is an example of a dedicated
dry brush.
To apply a dry-brushed highlight, first mix a little white
paint into a puddle of base coat color. Always use a different
brush for mixing in order to keep your dry brush dry. It may
be a good idea to let the paint sit for a few minutes, giving it
a chance to thicken and making it easier to apply. When the
paint is the right consistency, tap the dry brush into the paint.
You want only a little paint on the tip of the brush.
Wipe the excess paint onto a paper towel or piece of
paper until almost no paint comes off the brush. With angled
strokes, brush the figure to catch panel edges and details. If
the lighter color isn’t catching the details, then dip your brush
again. Once the entire figure is highlighted this way, you can
add a little more white to the mix. This lighter mix should be
applied with less pressure than the last one. This technique is
easy to learn but difficult to master. Practice and do what you
are comfortable with.
Experiment by leaving differing amounts of paint on the
bristles and altering the amount of pressure you apply with the
brush. You’ll soon see what looks right and what looks messy.
Panel Painting and Blending
Panel painting and blending are two advanced techniques
used to accentuate the three-dimensional surface features of
a miniature ´Mech or vehicle. In our examples, we used the
panel painting technique when adding our middle tones.
When panel painting or blending a section of a miniature,
first paint the entire section a darker shade of the base color;
a coverage wash will suffice for this purpose. After this coat of
paint or wash has dried, paint each panel with the base color.
Be sure to use a size 0 brush for this so you get a clean, even
coat on each panel. If you make a mistake and paint outside
the line, just wipe it off and try again. Clean your brush after
applying the base color. (In our examples, the base color is the
middle tone of each section.)
If you are blending, you can paint onto the base color before
it dries. Paint the edges of the panels with a lighter shade of
the base color. Blend the edges where the highlight and the
base color meet, so that the edges disappear.
After applying the highlight, clean your brush. If you like,
you can add a second highlight to the section. Simply go back
to your palette and add a touch of white to the color to lighten
it more. Then apply this third tone to the edge of the panels.
Leave a band of the second tone showing, or blend the edges
between the second and third tones.Panel painting and blending can be a bit tricky, so it’s a
good idea to practice on an old miniature before you try these
techniques on your favorites. In addition to changing the tone of
each successive layer, you can change the consistency of the paint
by mixing in a bit of water to thin it.
Blacklining
Blacklining requires a steady hand and fine brush control,
so you may want to wait to try this technique until you’ve had
a bit more experience. Blacklining consists of painting fine lines
between different parts of the miniature to separate one area
from another. Often this is done as one of the last jobs on the
figure. Many modelers use black to do their outlining (hence the
term blacklining), but you can also use dark grays and browns.
When blacklining, the consistency of the paint is the most
important factor. Generally, the paint must be thinned a little so
that it flows freely and can be applied in thin lines. If the paint is
too thin, however, it will run, making it difficult to paint controlled
lines. Acrylic inks and fine permanent ink pens also work well for
blacklining. Inks can be purchased at local hobby stores; most
paint lines have a selection of inks. Art and craft stores also carry
artists’ ink. If you use this ink, it’s advisable to thin it before applying
it to the miniature. Ultra-fine 005 permanent pens can be found at
art and/or craft stores and come in a variety of colors.
Last edited by Cranston Admin Snord on June 12th 2011, 12:22 pm; edited 3 times in total
Josh.0- Captain
- Posts : 162
Join date : 2011-05-04
Location : N.W. Ohio -
Re: Painting Tips and Tricks
![]() Spectre June 11th 2011, 3:41 pm
Spectre June 11th 2011, 3:41 pm
What Josh.0 has posted above is a very good start. I think another thing all "new" painters should check out is "Painting and Tactics Guide" on the download section of the Catalyst site, the painting guide was written by Ray Arrista and has many good tips in there for begginers (and guys that are a little "rusty"). I think the best thing for anyone to do that is interested in painting miniatures is to search the web, library, etc., and ask as many questions to compile thier own "tips list"...gather as much knowledge on the subject and then try different techniques to see what works best for YOU. There are as many ways to paint a mini as there are people who paint them, and everyone developes their own individual "style". Have fun with it and dont be afraid to try something new!!, its very easy to strip the paint and start over so there is no such thing as an "ruined paint job"...Good Luck!
Spectre- Field Marshall
- Posts : 224
Join date : 2011-05-04
Location : Ohio


Page 1 of 1
Permissions in this forum:
You cannot reply to topics in this forum|
|
|