


Works in Progress
2 posters
Page 1 of 1


Spectre- Field Marshall

- Posts : 224
Join date : 2011-05-04
Location : Ohio
 Re: Works in Progress
![]() Spectre May 17th 2011, 7:36 pm
Spectre May 17th 2011, 7:36 pm
Here are a few buildings in primer awaiting paint and basing.

"Control Center"
"Factory"

"Observation Tower"
This last one has not even been primed yet, but it shows what I used to make it (hairspray caps, tubing, broken toy part, model car parts). It is going to be a Fuel Refinery/Bulk Storage Facility. Hope you like them!

"Control Center"
"Factory"
"Observation Tower"
This last one has not even been primed yet, but it shows what I used to make it (hairspray caps, tubing, broken toy part, model car parts). It is going to be a Fuel Refinery/Bulk Storage Facility. Hope you like them!
Spectre- Field Marshall
- Posts : 224
Join date : 2011-05-04
Location : Ohio
Re: Works in Progress
![]() Josh.0 May 17th 2011, 8:40 pm
Josh.0 May 17th 2011, 8:40 pm
Wow! Those are just awesome man. The refinery and Factory are really really cool.

Josh.0- Captain

- Posts : 162
Join date : 2011-05-04
Location : N.W. Ohio -

Re: Works in Progress
![]() Spectre June 9th 2011, 2:14 am
Spectre June 9th 2011, 2:14 am
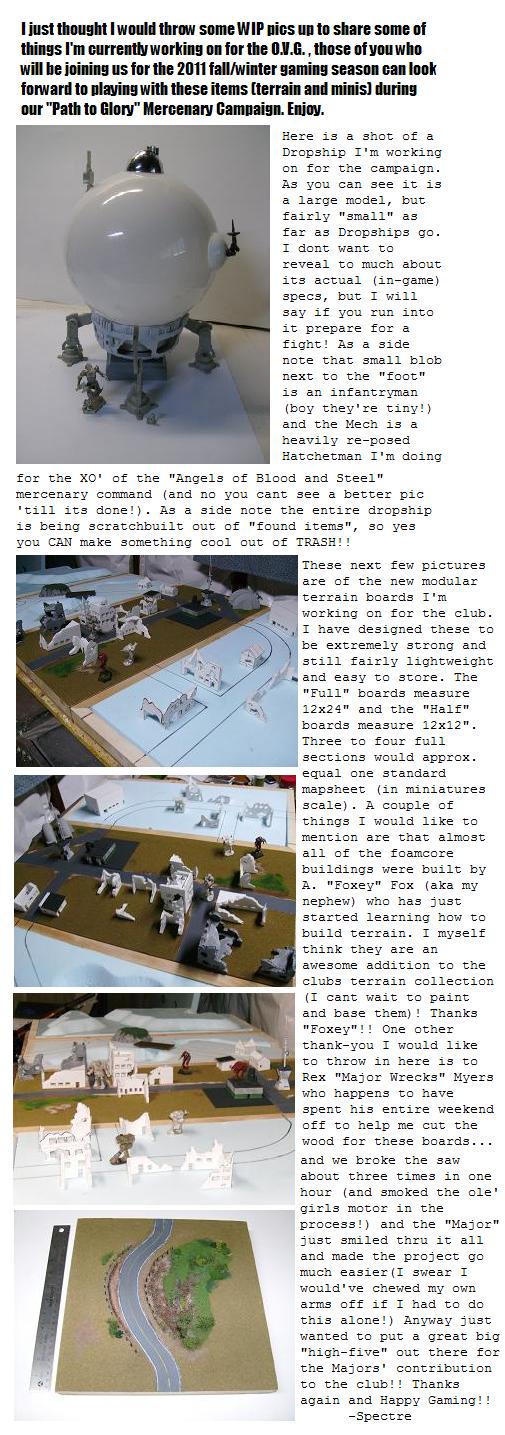
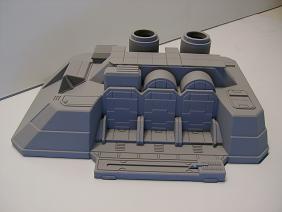
This post is really a "part two" of my "Alternate Basing" post, but do to the overall nature of THIS post I didnt think it belonged there. After many talks with Josh.0 and others in the club on the subject of terrain making I decided to work out a few things to give members a "jump" on how to make things. I have tried to write this (and other things on the forum) from a "rookie" perspective, so I hope this helps. I set about to challange myself to stray from some of my normal techniques and try to make terrain with materials that are easy to come by (no hobby shop needed) and built using a more "rookie-freindly" methods. This post ties directly into my "coffee grounds" as a basing material. So what are we making?? Well I was working on "rough terrain" templates and I intended to build some bomb craters.....so....
As you can see from the photo the base is made from 1/8th" Masonite ($6- 4'x8' sheet) , I rough cut a bunch of templates out of this at once so I can "batch build". Cut your Masonite into organic shapes (kidney, tri-lobe, etc) of various sizes, after cutting (jig or scroll saw) take a Dremel or sander and bevel the outside edge. The craters were rough cut out of 1/2" HDF Bluefoam Insulation (comes in pink also), this can be found at home improvement stores from about $8-24.00 a sheet(4'x8') the price goes up depending on thickness. The foam can be rough shaped with a sharp snap-knife or scalpel blade. I also own a Hot-wire Foam tool, but it is not needed for such a small project. After cutting my "craters" I glued them to the Masonite with plain old white glue. The next step is to "rough-up" the ground a little (after all a bomb just went off!). WARNING- This part is REAL messy!! Get some tinfoil or waxpaper out and cover your work area with it, or at least enough of your bench/desk that can handle the size of your template and give you room to work. Ready....SPITBALL!!
Ok, calm down..its not really a spitball. Get out some white glue and mix it 50/50 with water (in an old butter tub perhaps), next go buy a roll of the cheapest-nastiest-roughest NON PATTERN toilet paper. Thats right, I said it T.P.! Well after all the point is to avoid the (often expensive) Hobby Shop!! Now take a decent size piece o' tp and dunk it into your 50/50 mix, pull it out and ring as much glue out of it as possible, transfer your drippping mess to your template and slap it on! Dont worry to much about placement, you will have plenty of time to "adjust" it.
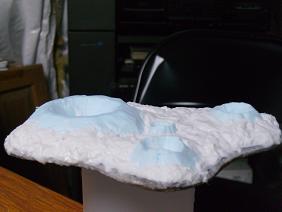
Now, this whole mess can be pushed and "sculpted" into the foam craters..get it where you think it looks good and leave it set for an hour. After an hour go back and "re-adjust" your paper as needed. I recommend running some water over your fingers and then "smooth" or "contour" the paper as needed. Also as I said before this makes a mess so I keep mine on the waxpaper so it isnt stuck to my bench the next day. When using this method I make a bunch of these at once so I only have ONE mess!! Now very carefully lift your template by the edges and set it on top of an old spray can lid in an out of the way spot...this stuff needs to dry for a couple of days. Once the glue-soaked paper cures it will be hard as a rock.


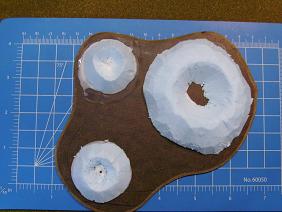
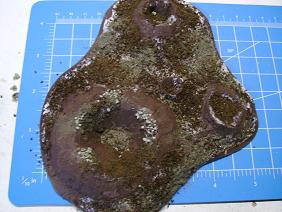
These pics are of the same template two days later right after base painting with Dark Oxide Brown. This was choosen as my base color due to the fact I am making these as "freshly bombed earth", alternatively you could base these black (for moon craters) or maybe a rust red ( for "mars" type surface). Please ignore the shine on some of the paint (took pics while painting), I assure you it is "flat" paint. After base painting I then proceeded to give it a healthy coat of white glue.

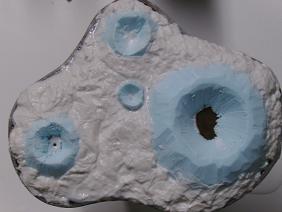
Now here comes my fav---COFFEE GROUNDS!! I started applying my grounds in random spots all over the terrain template. If you look closely you will see I used a couple of "grinds", one finer-one more coarse. I left my grounds to dry for about an hour and then (last pic) started to paint them.

Thats all for now, I will post part two of this within a couple of days and show you how to paint and finish the template. I hope you enjoyed this project, I have tried very hard to use materials that you can get from any hardware store and are "cheap" and easy to work with. I also tried to show what could be done with the most basic of tools. See you next time!!
As you can see from the photo the base is made from 1/8th" Masonite ($6- 4'x8' sheet) , I rough cut a bunch of templates out of this at once so I can "batch build". Cut your Masonite into organic shapes (kidney, tri-lobe, etc) of various sizes, after cutting (jig or scroll saw) take a Dremel or sander and bevel the outside edge. The craters were rough cut out of 1/2" HDF Bluefoam Insulation (comes in pink also), this can be found at home improvement stores from about $8-24.00 a sheet(4'x8') the price goes up depending on thickness. The foam can be rough shaped with a sharp snap-knife or scalpel blade. I also own a Hot-wire Foam tool, but it is not needed for such a small project. After cutting my "craters" I glued them to the Masonite with plain old white glue. The next step is to "rough-up" the ground a little (after all a bomb just went off!). WARNING- This part is REAL messy!! Get some tinfoil or waxpaper out and cover your work area with it, or at least enough of your bench/desk that can handle the size of your template and give you room to work. Ready....SPITBALL!!
Ok, calm down..its not really a spitball.
Now, this whole mess can be pushed and "sculpted" into the foam craters..get it where you think it looks good and leave it set for an hour. After an hour go back and "re-adjust" your paper as needed. I recommend running some water over your fingers and then "smooth" or "contour" the paper as needed. Also as I said before this makes a mess so I keep mine on the waxpaper so it isnt stuck to my bench the next day. When using this method I make a bunch of these at once so I only have ONE mess!! Now very carefully lift your template by the edges and set it on top of an old spray can lid in an out of the way spot...this stuff needs to dry for a couple of days. Once the glue-soaked paper cures it will be hard as a rock.
These pics are of the same template two days later right after base painting with Dark Oxide Brown. This was choosen as my base color due to the fact I am making these as "freshly bombed earth", alternatively you could base these black (for moon craters) or maybe a rust red ( for "mars" type surface). Please ignore the shine on some of the paint (took pics while painting), I assure you it is "flat" paint. After base painting I then proceeded to give it a healthy coat of white glue.
Now here comes my fav---COFFEE GROUNDS!! I started applying my grounds in random spots all over the terrain template. If you look closely you will see I used a couple of "grinds", one finer-one more coarse. I left my grounds to dry for about an hour and then (last pic) started to paint them.
Thats all for now, I will post part two of this within a couple of days and show you how to paint and finish the template. I hope you enjoyed this project, I have tried very hard to use materials that you can get from any hardware store and are "cheap" and easy to work with. I also tried to show what could be done with the most basic of tools. See you next time!!
Spectre- Field Marshall
- Posts : 224
Join date : 2011-05-04
Location : Ohio
Re: Works in Progress
![]() Josh.0 June 10th 2011, 10:31 am
Josh.0 June 10th 2011, 10:31 am
Wow, these craters are great!..T.P...who woulda thunk it?!?! Thanks for this. +rep
Josh.0- Captain
- Posts : 162
Join date : 2011-05-04
Location : N.W. Ohio -

 Similar topics
» Christmas, the New Year, and how I was inspired by "Super Dungeon Explore"
» Work-in-Progress Delays
» Work-in-Progress Delays
Page 1 of 1
Permissions in this forum:
You cannot reply to topics in this forum|
|
|